 Template Skin Theme X-Cart Classic")
Addons
Easily create a basic blog in a few steps.
Blog posts are essentially products in disguise.
You simply assign ONE parent category as your blog category. You can add blog subcategories if you wish.
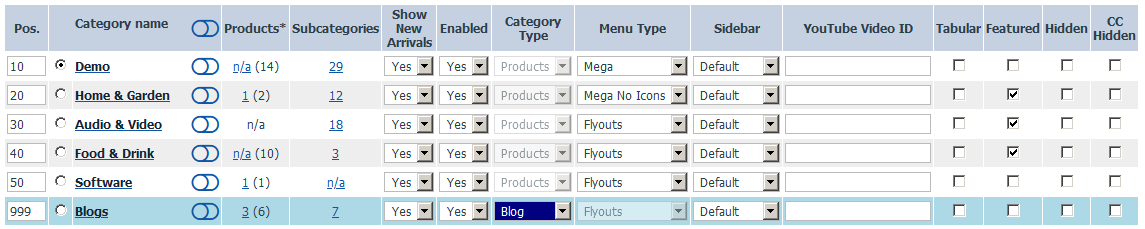
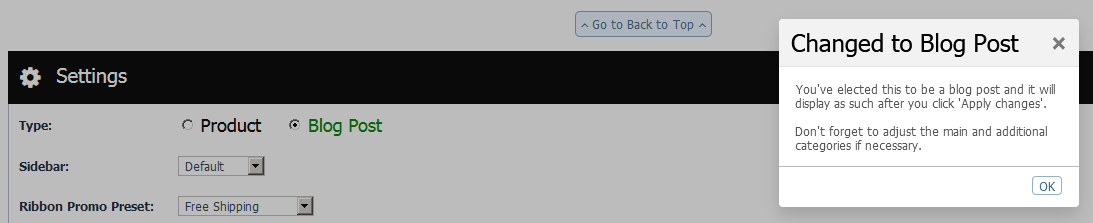
Then in the product modify pages, you can assign products to be a blog post, and set the blog category / subcategory.
The blog templates are in /skin/reboot/custom/blog/
The built-in blog has many advantages over using Wordpress...
- There's none of the security risks associated with Wordpress
- You can add the same content to posts as you can with products, eg. videos and files etc.
- Customers can add reviews/comments to posts in the same way as products
- Blog posts can be assigned to additional product categories
- Blog posts can show up in general product search results, so customers might find a useful article to read
- Blog posts can be defined as related (upselling) items for products, so act as support pages for your products
- You can set upselling products for each blog post, and have reciprocal links from products back to blog posts
- You may have a product as yet unreleased or coming soon. You can initially set it as a blog post, then change to a product when it's available for sale
If you'd prefer to use the Wordpress blog addon, see below...
May 2021 - We no longer recommend using Wordpress with X-Cart, largely due to the security risks associated with third-party plugins. Please use with caution.
Seamlessly integrates a Wordpress v6.x blog.
Follow the steps below...
Step 1
Download the latest v6.x Wordpress from the official site here.
Step 2
Install to /blog. We recommend you install to the X-Cart database, see /config.php for your database connection details.
Step 3
Once installed, ensure the /blog/.htaccess file is BLANK.
Then change the file permissions on /blog/.htaccess to 444 (non-writable).
(You may need to perform this operation via your hosting control panel file manager)
Step 4
Download the wp-bootstrap-4 theme folder and unzip the folder to your /blog/wp-content/themes folder.
Step 5
In Wordpress Admin > Appearance > Themes, activate the WP Bootstrap 4 theme.
Step 6
In your store /.htaccess
AFTER...
(OR AT LEAST *BEFORE* THE CLEAN URLS CODE...)
INSERT...
If your store resides in a subfolder, change #RewriteBase / to eg. RewriteBase /store/
Step 7
Enable the Wordpress addon in the reBOOT settings > Addons
Installation complete!
You should now be able to view your blog at store.com/blog
Post-Install
Lock down your Wordpress /blog/wp-admin/ folder.
This addon requires the provided WP Bootstrap 4 theme. Other themes will not work.
You may be prompted to install the Kirki Customizer Framework plugin, but this is optional.
Change your Wordpress permalinks setting in Settings > Permalinks
You can customize the sidebar by editing /skin/reboot/custom/wordpress_sidebar.tpl
Warning, Some Wordpress plugins can be vulnerable to hackers, contain malware, or 'call home' etc. so be extremely careful which ones you install. Only install plugins from genuine vendors. We cannot be held responsible if your store is compromised as a result of using a bad plugin. Use as few plugins as possible and disable or uninstall/remove any not in use. You can always use the built-in blog instead of Wordpress.
If you have previously installed the blog on a development URL, eg. https://dev.mystore.com and you have moved the store to https://www.mystore.com
Carefully apply this SQL patch along these lines...
UPDATE wp_options set option_value=replace(option_value, 'https://dev.mystore.com', 'https://www.mystore.com');
UPDATE wp_posts set post_content=replace(post_content, 'https://dev.mystore.com', 'https://www.mystore.com');
UPDATE wp_posts set guid=replace(guid, 'https://dev.mystore.com', 'https://www.mystore.com');
UPDATE wp_postmeta set meta_value=replace(meta_value, 'https://dev.mystore.com', 'https://www.mystore.com');Protects your forms from abuse by bots. Additional honeypots available also.
Requires PHP edits. Template edits are already done. Full instructions are available in your zip file /ADDONS folder.
To obtain new reCAPTCHA 'Site' and 'Secret' keys, get them here (use the reCAPTCHA v2, I am not a robot type).
Informs you whether orders were made on a desktop, tablet or mobile device.
Displays icons on the order listing pages. Requires a database change and a PHP edit.
Step 1
Apply this SQL patch...
Step 2 Updated 13th Sept 2020
In /include/func/func.order.php
AFTER...
INSERT...
Step 3
In Admin > Tools > Maintenance, click the 'Clear' button underneath 'Clear X-Cart cache'.
Done.
When a customer places an order, the xcart_orders table 'deviceType' column will update to either 'M', 'T' or 'D'.
You'll see the device types in your orders listings.
You can also use the Smarty variable, {$deviceType} around your store...
Eg.
{if $config.Reboot.reboot_device_detect_enabled eq "Y"}Welcome, {if $deviceType eq 'M'}Mobile{elseif $deviceType eq 'T'}Tablet{elseif $deviceType eq 'D'}Desktop{/if}{/if} user!
Step 4 NEW
In your template zip file /ADDONS folder, there is a free, improved Order Insights module.
- Real time historical order data for the last 10 years
- Displays total orders and total sales as nice canvas based charts, which can be saved as images
- Filter orders by order status
- Ability to compare orders for two years
- Collects / displays % of devices that customers ordered with (mobile/tablet/desktop/unknown)
- Charts can be line or bar charts
- Device charts can be doughnut or pie charts
Enables you to update your important page titles and meta descriptions in bulk, rather than having to update them page by page.
Switches will appear on the admin product, category, manufacturer and static page search results.

Template edits are already done. Requires PHP edits.
Step 1
Perform the PHP edits in your reBOOT zip file /ADDONS/X-Cart_reBOOT_[reDUX]_Advanced_Page_Meta/install.txt
Step 2
Enable the Advanced Page Meta addon in the reBOOT settings > Addons
Step 3
In Admin > Tools > Maintenance, click the 'Clear' button underneath 'Clear X-Cart cache'.
Done. You should now be able to update titles and meta descriptions in bulk from the product/category/manufacturer/page listings.
If you wish to migrate from CDSEO to Clean URLs, there's a script available here.
Easily create unlimited custom contact forms, no PHP skills required.
Layout your form fields in responsive tables, or any way you want in a custom Bootstrap grid.
Full details available here.
Installation instructions are in your reBOOT zip file /ADDONS folder.
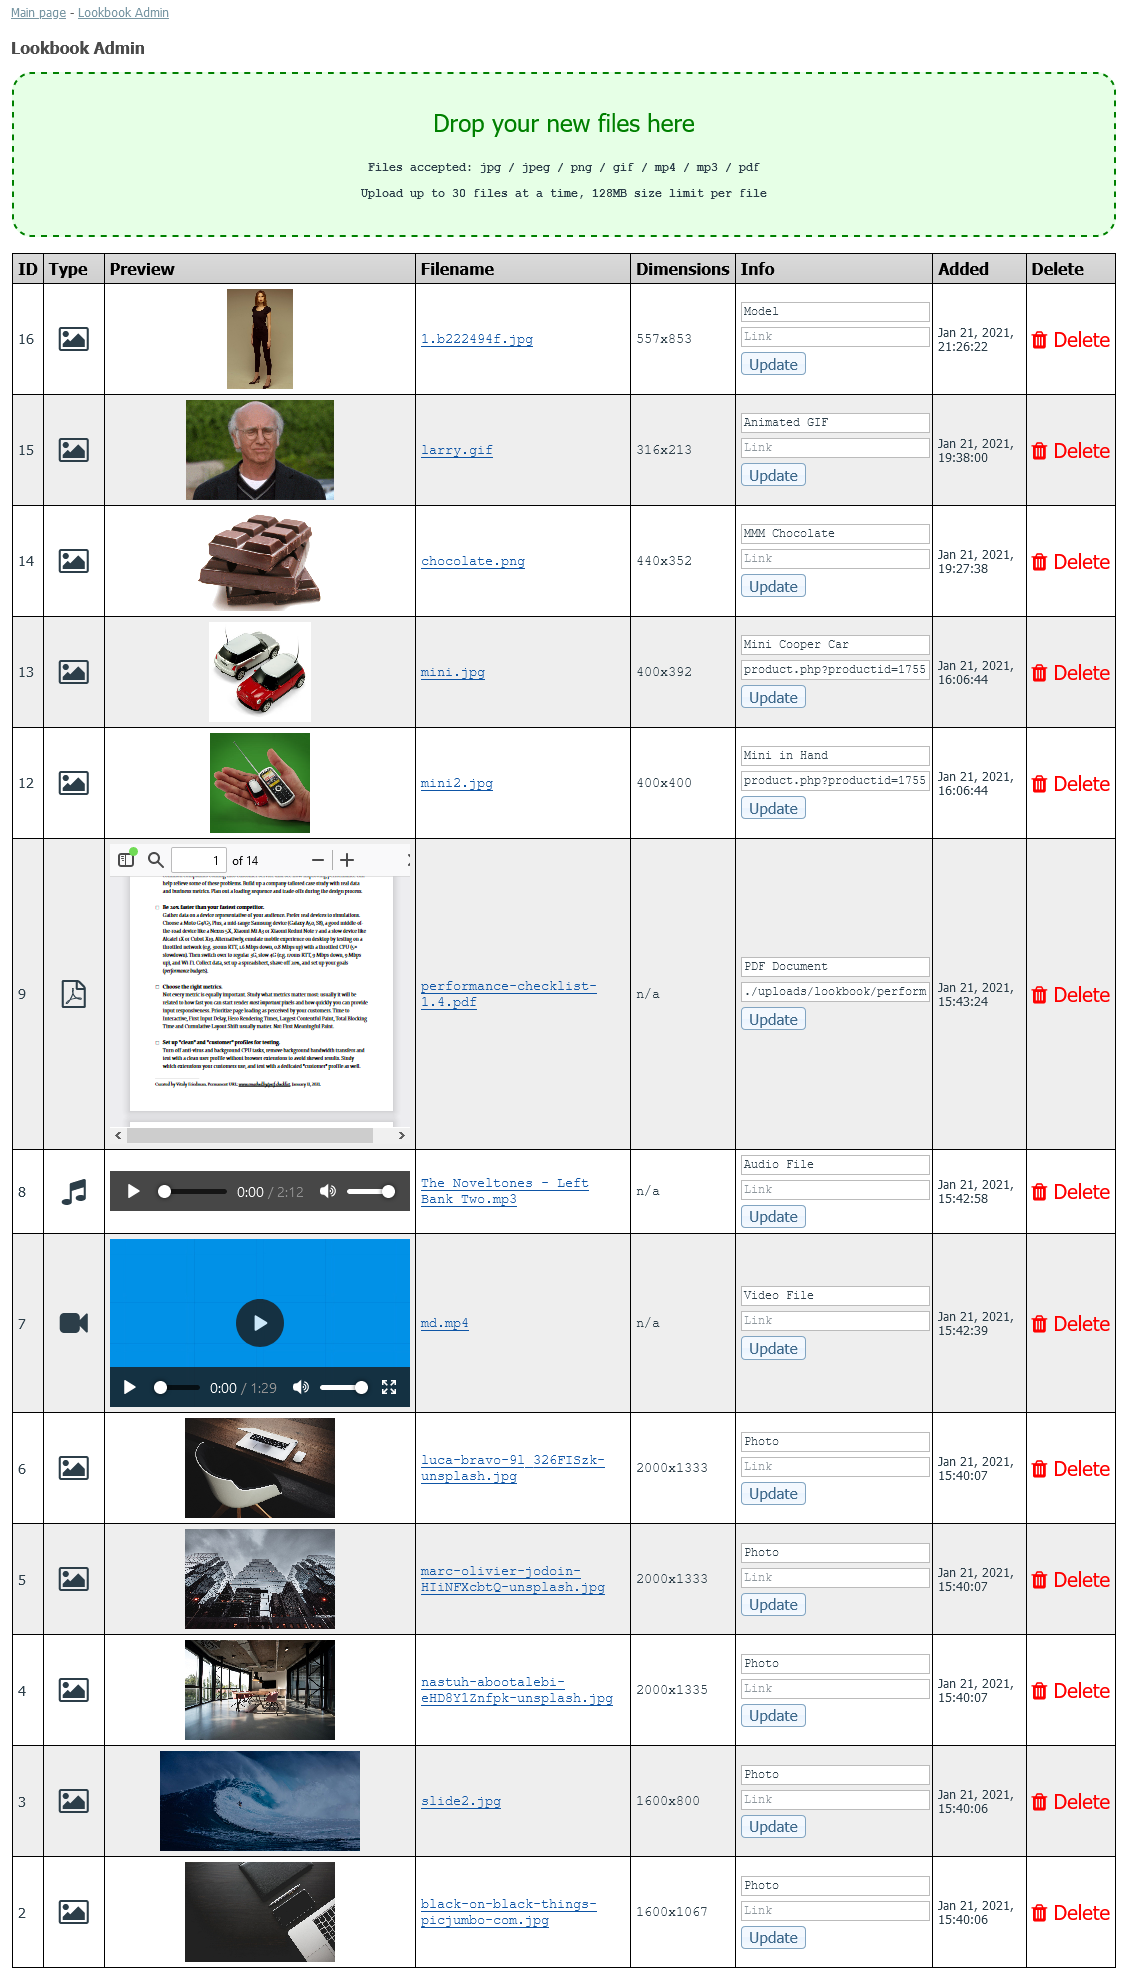
A multimedia gallery for images, video (MP4), audio (MP3) and PDF documents.
- Lookbooks are commonly used on fashion websites, but could be used on any kind of store.
- Uses a masonry style layout, sorts items by date added, filterable by file type, zoom lightbox for images.
- Optional columns changer, search and social share buttons.
- Includes a simple backend for uploading/managing files, editing titles and links. Upload up to 30 files at a time with drag and drop.
- Files are stored in
/uploads/lookbook/. Data is stored in a new database table,reboot_lookbook. - Demo / Admin Screenshot.
If you want to rename lookbook.php to something else, get in touch.
![]()
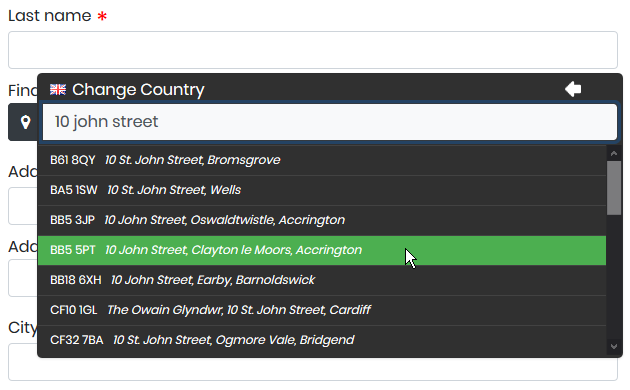
As of 7th July 2020, Crafty Clicks rebranded as Fetchify.
This addon is built-in as of May 23rd 2020. To install on an earlier version, the patch files and instructions are here.
- Powered by Fetchify (14 day free trial available)
- Predictive search-ahead technology
- Speeds up address forms and validates address data at the point of entry
- A flexible system that works anywhere in the world
- Pay as you go, monthly and annual plans available
- Please note, works with the one page checkout only
Displays a countdown to when next day delivery is possible, with a terms and conditions modal.
Adheres to weekends and adjusts the countdown accordingly.
The script may need tweaking, if for example you deliver on weekends. Get in touch for advice.
Can be enabled/disabled in Template Settings > Product
Defined terms will display a help link that displays a popup with the term description.
Go to the Glossary Manager in admin to manage terms and descriptions.
They are saved to /skin/reboot/custom/glossary/glossary.json
You can also link to glossary.php which will list all terms and descriptions.
The addon can be disabled in reBOOT settings > Addons.
Up to 10 sections, with up to 20 questions and answers per section. Filterable and searchable.
All section headers, questions and answers are language labels and editable via the admin header FAQ menu.
The dedicated FAQ page is at faq.php
While you create your FAQs, the addon can be disabled in reBOOT settings > Addons.
Unlimited FAQ categories and answers with easy to use manager. FAQs are searchable.
The dedicated FAQ page is at faq.php
Unlimited gallery categories and images with easy to use manager. Galleries can also be assigned to products.
The dedicated gallery page is at gallery.php
Upselling products on auto-pilot.
Set upselling products by category or manufacturer. Set the amount of products to display. Make them random or not.
Saves the laborious task of adding upselling products one-by-one.
Allow your customers or clients to leave feedback.
Option to allow only registered customers to be able to post a testimonial.
Easy to use manager, where you can add/edit/delete and leave a reply comment if you wish.
The dedicated testimonials page is at testimonials.php
If you don't want to display the testimonial avatars, edit /skin/reboot/modules/Testimonials/testimonials.tpl and change no_avatar=false to no_avatar=true
To mass-delete unwanted, unapproved testimonials, use this SQL patch...
DELETE FROM `reboot_testimonials` WHERE `approved` = 'N';Simple page view counter for products and/or blog posts.
You can check which products are most popular and when they were last viewed. See the admin header reBOOT menu.
Page view counters can be publicly displayed or not (see the template settings > addons).
Reset page view counters to zero at any time with SQL patch...
UPDATE xcart_products SET page_views = 0 WHERE blog = '';
UPDATE xcart_products SET page_views = 0 WHERE blog = 'Y';Displays featured categories and manufacturers in dialogs or carousels.
Set featured categories in your admin category listings and featured manufacturers in your admin manufacturer listings.
They can be displayed in various ways, including carousels.
Make selected coupons visible to the public.
Displays coupon codes around the store, with countdowns to expiry.
Option to make public coupons visible to registered customers only.
Option to add custom coupon text and icons.
Coupon codes and expiry dates can be modified after adding a coupon.
The dedicated coupons page is at coupons.php
Saves a few clicks when navigating around admin.
Search by product, SKU, manufacturer, order ID, customer and language label.
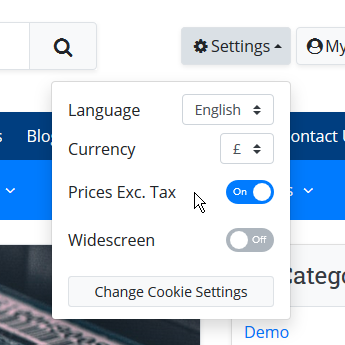
Setting to display catalog prices including and excluding tax.
For basic customer guidance around the catalogue and product pages.
Built-in as of Sept 22nd 2020.
Some suppliers may require you to advertise certain products at a strict minimum price.
If you would like this addon created, please vote for it.
Allow customers to submit a request for price match based on competitor's product price.
You can use the ECCF addon to add a price match request form in minutes.
Helps you find SEO issues on your website.
If you would like this addon created, please vote for it.
Switchable dark colour scheme. Remembers choice using local storage.
If you would like this addon created, please vote for it.
© 2013-2026 xcartmods.co.uk